![]()
![]()
![]()
![]()
![]()

|
|
|
100% Made in USA
JDM Design
FI Supports:
|
Premium Automotive DetailingIntroduction to Compulsive DetailingI've been a professional detailer for 2 years and I generally do cars of friends and business acquaintances in the Southern California area (Orange County). My business spreads through word of mouth and most of my clients request repeat services. If you are interested in having a car detailed feel free to contact me at: flexinnovations@gmail.com for any questions or comments. TECHNIQUES
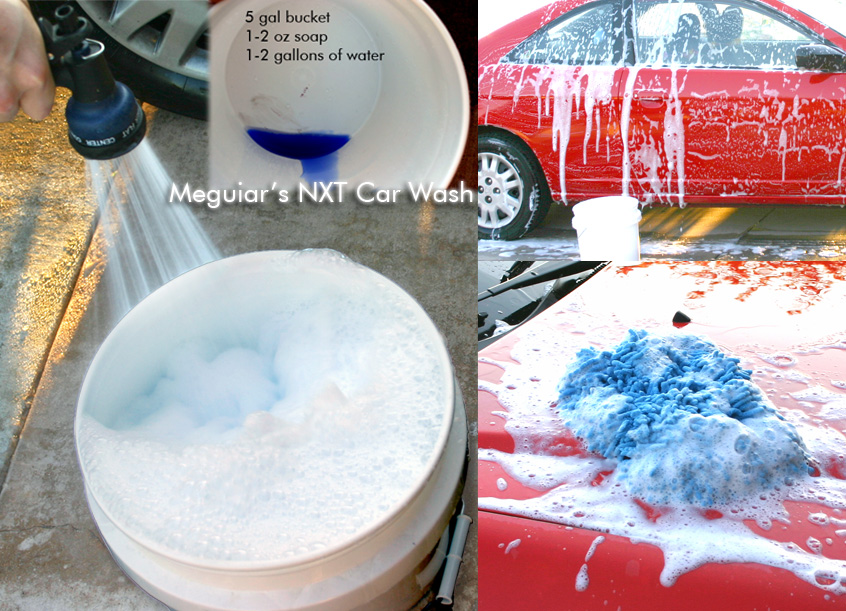
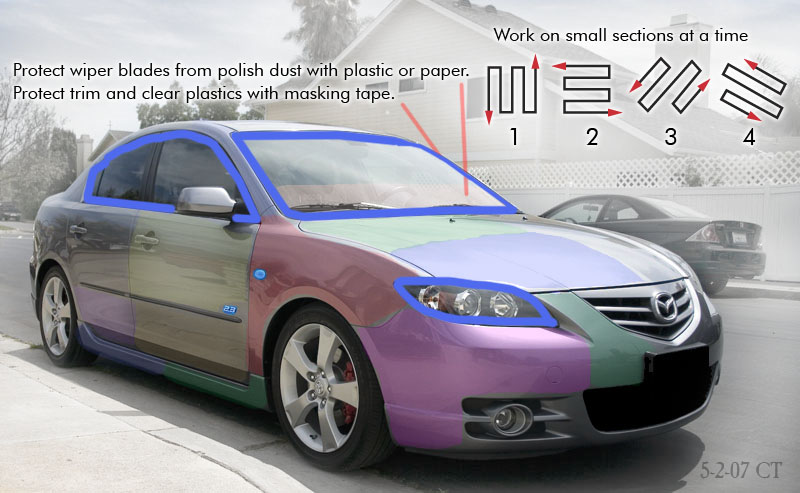
A PREMIUM DETAIL (Price Range will be about $250-$500 depending on extent of detail. Full Detail = 6-8 hours or Show Car Detail = 12 hours): SAMPLE 1. Rinse Wheels and Wheel Wells of excess brake dust and dirt. 2. Pre-wash lower half of car with P21S total Autowash to break down tar, oil, grease, etc. 3. Wash Car, rinse and dry (Use Gold Class, NXT, Menzerna or Zaino Shampoo) 4. Clay the paint (Fine or Aggressive) 5. Mask trim and areas from dust with blue painters tape then polish with one or a combination of polishes to remove swirls or restore clarity to headlights. 6. P21S paintwork cleansing lotion 7. Carnauba or Synthetic Sealant (Brazilian Ivory Carnauba, Zaino, Menzerna FMJ, or an AIO) 8. Remove tape and clean and add dressing/protectant to rubber and plastic trim 9. Wipe down the car with detail spray to get rid of smudges and finger prints 10. Clean exterior glass with glass scrub, add rainclear. 11. Clean interior plastics, dash, cup holders, etc with colorfast all purpose cleaner 12. Vinylex the interior (or use 303) 13. Clean upholstery or leather and add leather conditioner massaged by hand. Dry-clean stains, and use febreze or un-scented odor neutralizer. 14. Clean interior glass. (Safe on tint) 15. Wipe down all finger prints and close door with towel. Rinse Wheels and Wheel Wells While the car is on the driveway, I first rinse the wheels and shoot a jet stream directly onto the rotor so it sprays the brake pads and calipers. Usually I will spray until the black brake dust goes away. Then I will quickly wash the wheel wells with a strong, yet safe citrus degreaser such as P21S total auto wash. You can also use simple green, just make sure it’s diluted 50/50 and after scrubbing the wheel well with a soft brush, rinse it well. (I use a Popsicle style long wheel brush or soft long bristle brush) Citrus degreaser and cleaner should “soak” for at least 60 seconds, but you don’t want it to dry on contact so do not use this near hot wheels. Pre-wash You can then use a “pre vehicle wash” which will be the P21S total auto wash. This is a citrus cleaner and should be sprayed over the bottom half of the vehicle. Most people skip this step and instead use their car wash soap to wash. This step will loosen grime, tar, soot, bugs, and make washing a whole lot easier. When you rinse this off after it has soaked, it will loosen up the grime and dirt. This would be a “frictionless” pre-wash. (You don’t want this cleaner to dry on contact so consider skipping this step if the car is hot and you are washing in the sun) Wash Car The method I use to wash and dry my car does not create too many swirls. A photo taken of my car right after approximately 150 washes showed very light swirling that I was unable to pick up with a camera. I’ve been the only person to ever wash my car and would never have a machine, or anyone else do it. If you see big “bugs” or baked on tar, now is a good time to saturate those areas with bug/tar remover, and then remove with a towel. You don’t want to contaminate your wash mitt. To wash, I hose the entire car down with a trigger spray shower nozzle. This part is crucial to get as much dirt off the car during “frictionless” rinsing so you won’t have to physically take the dirt off with a wash mitt. I don’t use a pressure washer, though if I did, I’d use a softer spray setting with filtered water heated to an ideal 95 degrees Fahrenheit. I have used fire hose nozzles and various garden hose nozzles and find that “triggers” are easier to turn on and off, and if it has a long “stem” such as those used for gardening, it can be easier to maneuver around though I find these reduce the water pressure a little too much to my liking. Rinse from the top of the car to the bottom to conserve water. You only need one hose, though if you want to speed up the wash process, you can get a “Y” adapter and split your hose into two hoses, one for each side of the car so they are readily available. I find that cold hose water will help cool the paint down if you are washing in the sun. The hotter the paint, the faster the soapy solution will dry. If possible, try to wash a car during sunrise, sunset, or on a cloudy day. I know this is not possible for everyone which is why I will give tips for washing in the sun. Now that the glass and paint is wet, it’s a good time to use Glass Scrub (by glass science) if you want to remove hard water spots or stains on any of your glass. Simply use a soft cotton detailer towel or micro fiber towel (MF) and on your completely wet outside glass, squeeze some Glass Scrub on your towel and gently rub the glass to work up a creamy lather. It smells of wintergreen, and is works VERY well at cleaning glass. This will remove rainx instantly and water will sheet off. DO NOT RUB HARD and make sure and follow the directions on the bottle. Glass scrub does contain abrasives that can scratch the glass if you do not use water as a lube and a soft towel. Now that your glass has been rinsed, rinse over the vehicle again and then I fill up a bucket with hose water. This is a wash mitt rinse bucket. Then add 1-2 oz of car wash soap to another 5 gallon bucket and shoot water rapidly inside to build up rich foam until the suds just start to overflow out of the bucket. (No suds? Use more soap. Too much suds, use less soap. Soap does not have an endless shelf life so get new soap if you think yours is old) CAR WASH SOAP
I find that Meguiars NXT contains synthetic water softeners which are gentle on the towels and wash mitts I use. It is also one of the stronger cleaners to use. For slightly weaker yet higher lubricity shampoo, you can use Meguiars Gold Class. For a boutique shampoo, I’d get either P21S body work shampoo or Pinnacle bodywork shampoo. The higher end soaps tend to have better lubricity, high foam, and be gentler on the paint. Turtle Wax F21 is green and has a lime scent. Meguiars deep crystal car wash has a green “plant” smell. Zaino soap is blue and scented “grape”, and Menzerna shampoo is yellow and has no odor (kind of smells like bubble solution). Since most soaps work quite similar to one another… I can only differentiate them by color and smell. Meguiars NXT is probably my favorite smell. It has a tropical citrus smell that’s about as refreshing as the lime scent from F21. I’ve been satisfied with the cleaning power of NXT so this is what I’ll use. WASH MITT
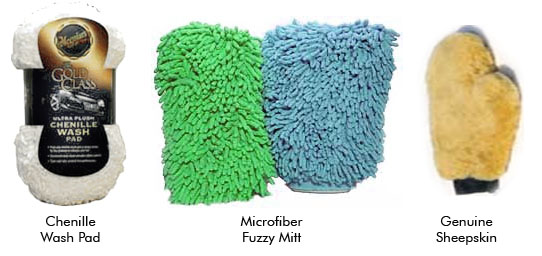
I then get to choose a wash mitt. For my own car, I like the fuzzy microfiber wash mitts because they can last 10 washes. For a professional wash, I’d have to choose an ultra plush quality chenille wash pad. (meguiars has a good one) I will use the chenille wash pad only once on a customer’s car, and then demote it to being a “used” wash mitt. The wash pad does not have a “collar” like mitts have which adds some safety. (Chenille lasts about 3 washes, cheap wal-mart $3 chenille wash mitts last one or two wash’s before they should either be discarded, or demoted to wheel/engine work) I do not recommend sea sponges, sponges, brushes, or any type of waterless or rinseless cleaning. For those that live in regions where using a hose to rinse your car is illegal, I’d suggest QEW (Quick easy wash) which might be found in the sporting good stores which is intended for campers. Optimum no rinse & shine, and DP rinseless 4in1 shine are other options for rinseless washing available at autogeek.com. Some people recommend a wash Schmitt which is foam wash mitt. This type of mitt will probably last the longest; hold lots of water, and be relatively easy to clean. However, there are pores in sponges which can trap particles which may be a possible hazard. I don’t really see the huge difference between the Schmitt and washing with a white “edge” polishing pad and I k now that if dirt gets on the white pad, particles can get stuck in the holes. (This doesn’t happen with hairy chenille or sheepskin). Get this for a long lasting “foam” wash mitt, only I’d be careful using it. Another mitt I have is a 100% natural Australian sheep skin. It lasts about 10 washes until the leather on the inside will begin to stiffen like a chamois. I tried leather conditioners and human hair conditioners on the mitt to rejuvenate, and although it helped a little, I don’t think you can get them to last a long time. What I didn’t like about the sheepskin is it doesn’t hold a lot of soapy water. I want to maximize the amount of soapy water that covers the vehicle. These are not cheap and since we’re talking “real” sheep, I don’t want to use them as disposables. I don’t suggest synthetic sheepskins because those get tangled and dry out and turn into scrubbing pads. One of the most swirl friendly methods of washing is to actually take a brand new deep pile chenille wash mitt and insert the end of your hose INSIDE the wash mitt and use this. This acts as a flow through wash mitt… The idea is to every so gently glide the mitt so it’s constantly being lubed by flowing through water. Personally I don’t do this method, but for those that want to master “intense” methods of washing, then I suggest to give this method a try. Before you use your wash mitt or pad, rinse it with hose water to make sure it’s clean, and then dip it inside the bucket to soak it. I then wash the car with quick gentle and long front to back strokes. I try to keep the wash mitt as saturated as possible and I will flip the wash mitt and use the back, and then before I re-dip it in the soapy solution I will rinse it quickly in the "rinse bucket". For bugs, I saturate it in wash soap and later I will soak it again, and agitate softly with the wash mitt. (hint: If washing in the sun, always wash the side of the car facing the sun last, so the soap won't dry on that portion of the car. It is also best to wash the shaded part of the car first) I dip my wash mitt about 6 times to wash the car. Once for each side, once for left roof and left glass, other for right. Once for rear and once for front. Work fast so the soap doesn’t dry, don’t press down on the paint since you are essentially saturating the paint to let the soap do most of the work. Don’t forget under the mirrors, the black plastic “bridge” part of the mirror, and the wiper cowl, and wiper blades. Make SURE you cover EVERY square inch of exterior paint with your wash mitt. I always wash the front bumper of my car LAST because it has the most bugs and contamination. You do not want to wash the bumper first and getting bugs in your mitt, and then scrub the bugs on the side of your car with their hard exoskeletons… A foam gun can also come in handy and those that have tried Mr. Clean Autowash pretty much know how a soap gun works. It’ll help you “spray” soapy water over a car, however you’ll still need to use a wash mitt to help remove the dirt. Home Improvement stores will sell foam guns for less than an online detailing store so check there first. A foam gun can add extra soapy water suds onto your car and all that you need is a rinse bucket. For fleet and large vehicle washing, a foam gun can be a real time saver though for my car, I tend to stick to the bucket and soap method. To Rinse, I spray the car down with the shower pattern to get all the soap off, then I will set the hose to a slow "almost trickle", and carefully drizzle the car from the roof and down. Water will sheet off and this will facilitate drying the car later since there will be less water droplets. Make sure you rinse out the inside of the mirrors since soap gathers in the side view mirrors. I also rinse the exposed radiator, wheel wells, and wiper cowl. If it’s sunny out, I will not bother trickling water to help dry because the sun will already begin drying the car and creating water spots. If it’s sunny, immediately dry the car after rinsing, DRYING
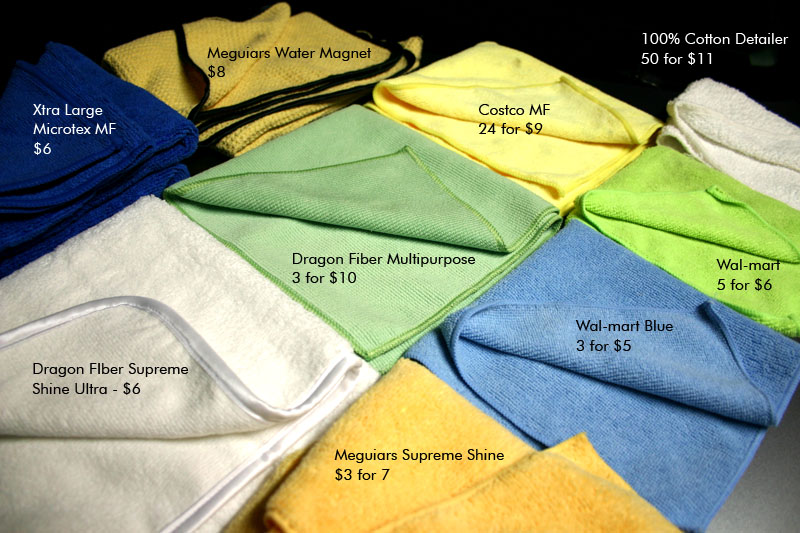
Here is a prime example of how not all Microfiber is created equal. The towels we decide to stick to are Meguiar's Supreme Shine and Dragon Fiber Supreme Shine. We separate them and wash them with Micro Restore. A microfiber detergent that maintains the towel's softness and absorbency. Drying must be done quickly to minimize water spots, so I use a California water blade or jelly blade (the big one, not the small one), and I quickly move the water off the top of the roof, then the glass, then the hood and trunk lid, and the sides. When doing the windshield, lift up our wiper blades and shake them a little, then dry them so there aren’t water spots left on the wipers or wiper arms. I try to get at least 60% of the water off with the water blade, and the rest of the water will be removed with either a MF waffle weave drying towel, or just a regular MF towel (which is what I use). The water blade does not scratch, but might if there’s still debris on the paint. When drying with a towel, I fold the towel twice, (cut the edges off if it’s MF) and lightly run it over the surface of the paint. NO RUBBING. It’s ok to leave some water droplets because the next step is claying which involves detail spray which will remove all the left over water spots. If you are not claying, then use a MF towel and detail spray to get rid of all the water spots if there are any. Dry the wiper blades, but don’t let any fibers get stuck there. (Look for chenille fibers especially). I also dry the bottom of the side view mirror housing, and dry the collection area of the wiper blade cowl. You may also want to use a quick wax as a wax booster. Eagle One Wax As You Dry can be sprayed onto a wet car, and then dried with a microfiber towel. If the towel gets TOO wet, this will leave small streaks of water droplets on the car. Wax As You Dry contains surfactants that will actually cause the water droplets to sheet off the car. If you notice any spots that you missed, now is a good time to clean those with a towel and detail spray (or sap remover). Another drying method which I use is “pat drying”. If you decide you want a re-usable synthetic chamois, I would have to suggest an “absorber” which sells for about $9. Please remember that if you are using a chamois, you must pre wet it, and wring it out. A dry chamois on wet paint is a sure way to scratch the paint. To dry, you don’t have to fold the absorber, just lay it on top and pat down. This won’t scratch the paint and you are simply absorbing the water droplets. I find that this method is safer than using “rubbing” motions, and “pat” drying can be used effectively with a micro fiber towel as well. Drying is one of the top ways to swirl your car. Especially for those cars that have not been fully washed… Remember that if a wash mitt does not touch a part of your paint, then that part will still be dirty. Make sure and wiggle the handle bars so water trickles out of those areas. On the Mazda3 I find you may also open the doors when drying since water will drip when you open your doors. Also make sure you get the water that settles in the side view mirrors, at the wiper cowl, and from the rear bottom black plastic piece. Compressed air can help with this part of the drying in small cracks, but I personally don’t use a compressor. Some people prefer high volume leaf blowers to dry their car. Although I see no problem with this, it’s rather loud, and consumes electric or gas energy. One idea I had one day was to use a brand new shop vac (UNUSED). Then hook up the nozzle in reverse so it becomes an inexpensive electric “blower”. Then use this as your drying mechanism with the appropriate nozzle. I would be hesitant to use a shop vac that had dust and debris on the inside because the last thing you want is dust sticking to the wet droplets of water on the car. Finish cleaning wheels and calipers
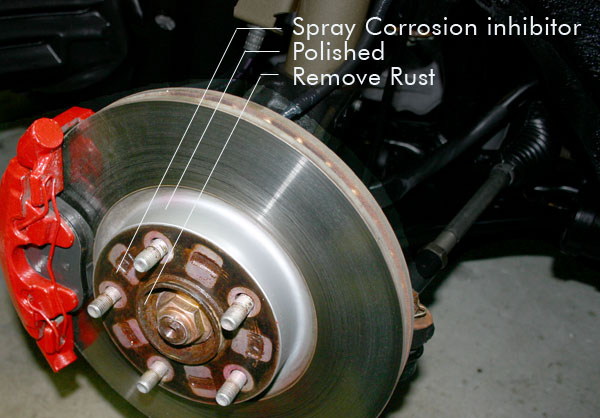
At this point, many people are finished. Well I’d say I’m about 25% done. I now have to move the car into a garage, remove the wheels, and put the car on jack stands. This step is more for "show car" details where a judge will get on their hands and knees and LOOK for hard to see areas that 99% of the population will overlook and not clean. To detail a show car, you have to clean areas that might not even be readily visible. To clean the rotor I put a low profile tub under the brake rotors, and then spray brake cleaner (or just simple green) onto the calipers, agitate with short handle soft bristle brush and rinse with water from a spray bottle. I use Vinylex all over the wheel wells till saturated and dripping. Then I use a metal polish around the exposed center hub of the rotor, then I apply a quick coat of wheel wax around the rotor hub to protect it. Each wheel then gets sprayed with Eagle One Wheel and Tire cleaner, then a long handle soft bristle brush cleans the inside and outside of the wheels till shiny. I then used Mothers Mag and Aluminum Polish applied with a 100% cotton detailer towel on the inside (non clear coated part) of the rim to get some of the stains out. Finally, after the wheels are dry, I applied two coats of wheel wax to the inside and outside of the wheels, and buffed the haze off. Wheel wax does better than any spray, synthetic, or carnauba wax I’ve ever used on wheels. It will make your wheels super slippery, and shiny, and will simply keep your wheels cleaner longer than if you used a wax such as Meguiars NXT. For the tires, I sprayed dupont teflon tire shine on a foam applicator, and carefully coated the rubber tire going about an inch on the treaded part. I apply this tire shine with two coats. This tire shine lasts weeks and slowly fades into a natural matte look. Almost every “GEL” tire shine product or THICK greasy tire shine loves to sling leaving tiny black spots in your wheel well, and on the side of the car. (Even if the product says “won’t sling”, it WILL depending how much you put on) There is a QUICK method for tire shine application and it involves constructed a wheel mask out of cardboard. This is used in conjunction with any watery or aerosol tire shine product such as Dupont Teflon tire shine, vinylex, or 303 aerospace for my tires. To make a mask, simply measure your wheel diameter, and use a razor blade to cut a circle from a large piece of cardboard (use two pieces taped together if you can’t find a big piece). Then wrap the mask with plastic, and tape it sealed. I re-install the wheels with proper torque in a star pattern, and set the car down. CLAYING
You can use mothers clay kit (my first pick), or Meguiar’s smooth clay kit. I detail a lot of cars so I use Meguiar’s last touch detailer solution (1 gallon for $17) as a clay lube. This solution is a concentrate so I dilute it 50/50 with distilled water. That’s 2 gallons of detail spray for $17 that works seemingly as well as $10 “boutique” bottles of detail spray I’ve tried in the past. I do not recommend car wash soapy water as a lube because this causes clay deterioration. By the time you finish claying half the car, the clay turns into play dough and starts to fall apart.
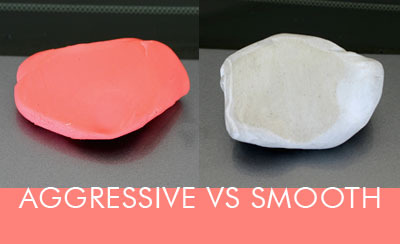
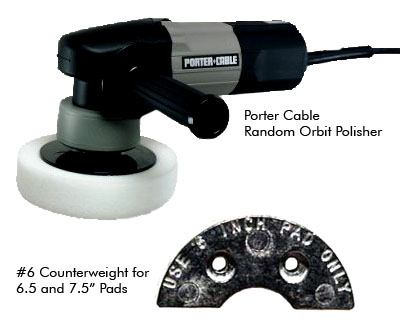
On MOST cars, I’d recommend Meguiar’s Blue Mild clay; however, the Mazda3 29Y titanium gray uses a hard clear coat that’s quite resistant to being easily marred similar to some porsches I've encountered. My Mazda has a hard clear coat and is typical to domestic paints and very unlike German “soft” paints such as that on 2000 year Volkswagens. Meguiars Red Aggressive Clay is a tougher clay compound that will work fine on some harder paints without scratching the surface. I tested it and could not find any marring on my car, though I would only suggest the red clay if you can remove any marring if it does occur. The red clay is much faster than mild clay; it can also remove ALL the contaminants quite easily unlike the regular clays, though it should only be used by someone with claying experience. The Blue Mild clay or any of the clay kits above will do the trick; it just may take a bit more time. Red clay should be used if you can machine polish it afterwards. If you go to your local auto parts store, I’d have to go with “clay magic” being my first choice because the clay is good, and the price is probably going to be the cheapest. My next pick would be “mothers” yellow clay. This works well, has cinnamon scented detail lube, and comes with a container you can store the clay in. My last pick is Meguiar’s smooth clay kit. Despite the fact that it comes with a top notch micro fiber towel, I’d say it’s the least user friendly clay. Sure it will work; it’s just that I think it’s not effective as other clays out there. Not to be confused with the meguiar’s smooth clay kit is the RED (aggressive), and BLUE (mild) professional clay bars. These clays do not come with detail spray but come in a reusable twist canister and has a little more than double the clay. (like 200 grams as opposed to 80 grams). These clays are quite effective and is what I recommend to those that are going to clay multiple vehicles. Don’t get this clay if you plan on using it once on your car, then storing it for a year before using it again. Clay’s don’t have an endless shelf life so invest wisely. To Clay, work on small areas at a time, spray detail solution over the paint in about a 2’x2’ area. Then use a chunk of clay the size of a golf ball and work it and squish it into a patty. Then make solid contact with the paint and gently rub the clay over the surface of the paint with short to medium length back and forth strokes. These claying motions should be in the same direction air flows over your car though both you and I know, that we’re going to “improvise” and rub the clay where we want. J You will hear and feel resistance when claying. Once you can’t feel or hear the resistance anymore, you can start claying another area. Remember to only clay the area that is well lubed. Once done, you can gently pat the dirty part of the clay on a CLEAN microfiber towel. I find that the detailing solution you are using as a clay lubricant gets chalky with some of the contamination. Rather than folding this inside of the clay, I pat it on a MF towel. Remember that you’ll need to gently wipe down the area with an edgeless MF towel and it should be smooth like glass. If not, repeat the claying. For some cars that have had severe overspray, I have to clay an area more than once, and use a bit more pressure. Then to repeat the process, simply fold the clay in half and knead it into another patty. REPEAT until all the paint is smooth. This patty can be used on about 2-3 cars before it should be tossed. Yes claying is expensive, but when clay gets dirty, I believe it EASILY adds scratches to your paint since it has all that fall out debris melded into it. NEVER drop clay on the ground, and when it’s not in use, you can keep it in a small zip lock bag or travel soap container. Don’t use aggressive clay in areas that are difficult to polish. Yes you can clay glass, but be extra careful. Another tip is to use OLD clay to clean your wheels. POLISHING Porter Cable Random
Orbit Polisher.
Model Numbers: 7336SP (#6 weight, blow mold carrying case and a 6" polishing pad) 7424 (#5
counterweight and 6" polishing pad) Note: Most polishing pads are 6.5”, and the ones I use are 7.5” so I suggest you find the 7336, or buy a 7424 and get a #6 weight.
The 6” polishing pad included should not be used on your car and is #54745 Wrench included is #48779
Description: 6-inch variable-speed random-orbit polisher; 2,500-6,000 rpm (level 1-6) 3.7 amp motor (110V); converts to five-inch polisher with optional pad 100-percent ball bearing construction for durability Includes polisher, wrench Measures 14 by 6-1/2 by 6 inches; Weight: 8-1/2 pounds 1-year warranty 5/16" spindle diameter Adjustable round
side handle (left, right, or side mounted) For most people, I suggest buying a package deal online
that comes with polishing pads such as a combo by autogeek, or properautocare.
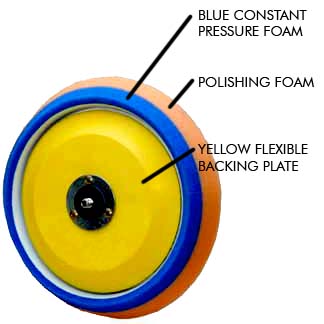
This will save money on the pads which will be needed for polishing anyways. POLISHING PADS There’s a compromise when finding the most effective pressure to use when machine polishing and since I find that various pads require different amounts of pressure, I can’t recommend a specific “pressure” to use. Some guides will tell you 15lbs, while others will tell you to just maintain contact with the paint. I think there’s a bit more to machine polishing than just these two rules. When using Lake Country pads (such as the 7.5” CSS pads), there’s blue soft foam behind the regular foam. This is the constant pressure foam and gives the pad a “suspension” that will help keep the pad in consistent contact with the paint. If you compress this constant pressure foam all the way, then you are applying too much pressure. However, if the soft blue foam is not compressing at all, then that’s probably too little pressure. The goal is to use a light enough pressure so the polish can be “worked” onto the surface and “scrub” the surface. The pores of the sponge help hold the abrasive particles which are suspended in the polish medium. As the particles are rubbed on the surface, some of the abrasive particles are broken down into smaller particles and eventually, the liquid medium has evaporated. This will leave behind a slight haze, or you may end up with dust particles.
What’s confusing is how the term “polish” is used and thrown around in the industry. Many products claim that they are polishes, yet they lack polishing effectiveness. I like to classify polishes as having the ability to remove scratches, swirls, hazing, etching, and scuffing. Then I would have to classify the many polishes out there into three basic levels.
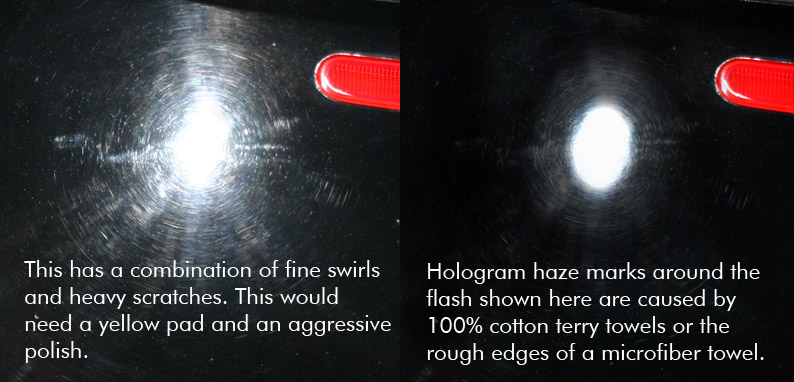
This is the soft paint used by Volkswagen. An unexperienced "mill" detailer will often use the wrong towels and create holograms or buffing marks. Here at FLEX, we use nothing but boutique microfiber. Most of the towels I use cost more than the bath towels used to dry myself at home.
Aggressive: Menzerna Intensive Polish (My Choice) Menzerna Power Gloss Meguiar’s #2 fine cut cleaner 3M Perfect-it Fine Cut Compound 3M Professional Rubbing Compound Stoner Clearcoat Compound Medium: 3M Finesse-it II 3M Swirl Remover for Dark Cars 3M Swirl Remover for Light Cars Zaino Z-PC Fine: Menzerna Final Polish II Pinnacle Paintwork Cleansing Lotion P21S Paintwork Cleaner Meguiar’s No 9 Swirl Remover Glaze: Menzerna Finishing Touch Glaze Meguiar’s #3 Machine Glaze Meguiar’s #7 Show Car Glaze 3M Imperial Hand Glaze Not to be confused with a PC is a rotary polisher. These are much more robust, they spin the pad in a rotational movement and have less vibration (they don't vibrate in tiny circles). The result is the pad will generate heat faster, it will polish quicker and easier. However, to an inexperienced detailer, they run the risk of polishing too much and burning through the paint which can happen to those not careful. PAINT CLEANSER: In general, I’d say paint cleansers contain chemicals that can help remove stains, contamination, haze, and improve the appearance of the paint by hiding micro swirls. (The kind that looks almost like a hologram). Many paint cleansers contain fillers that can help improve the final appearance of the paint while some may even have the ability to “polish” to a very mild degree. Through testing, I’ve found that paint cleansers actually help improve the appearance of the paint by making the color richer, and less hazed. Don’t expect it to remove visible swirls or perform miracles. I also don’t believe paint cleansers will benefit paint that is relatively new. I’d have to say that of all the steps, the paint cleanser and glaze can be skipped if needed since all cars really need is a Clay, Polish, and Wax. However, one of the big benefits of using a paint cleanser is your paint will be smoother and waxing the car will be easier. The product I use is P21S paintwork Cleansing Lotion. It’s very runny almost like milk and I like to apply it with a foam applicator. If I were to use a DA polisher I would choose either a RED “glazing pad”, or perhaps a WHITE “mild polishing pad”. Turtle Wax Ice Liquid Clay would classify as a “Paint Cleanser” even though it claims to replace clay. I had to pick myself up a bottle and got to test first hand that it’s actually not a bad paint cleaner. One single application of Ice liquid clay will remove two coats of cured Zaino. Water longer beaded on that area, though there was still a fair amount of physical contamination left on the paint. GLAZE: Whenever I hear “Glaze” I think of ceramic pottery and how pots become glazed in order to look glossy. Well automotive glaze does something similar. Glaze is supposed to improve the shine and glossiness of the paint. I believe some glazes contain tiny fillers though most of them contain some kind of lubricant to give the paint a “wet” shine. A glaze does not protect the paint, and I do not consider “glaze” as a cleaning liquid. Thus, it would probably be ideal to “clean” the paint with a paint cleanser, before proceeding to glazing the car. Following the glaze would then be “wax” which is designed to “protect”. Portfolio
|
Contact us at: flexinnovations@gmail.com .- © 2009 Flex Innovations, All Rights Reserved
All photographs are property of FLEX
INNOVATIONS
|